
Route-by-route team guide
PokéPath TD Best Team Builds by Route
Choose the route you are stuck on, follow the numbered placements, then adapt the team for its boss. These six plans explain where the damage, detection and support belong—and what to use when a Pokémon is missing.
Use these mechanics-based plans for normal mode. Match your boss, check your levels and keep each attacker within its support range.
Find your route and its main problem
Unlock stars identify the map; they are not a required team level. Match the final boss before copying a layout.
A shared water-and-field damage pocket, with a long-range attacker for the final boss.
Greninja · Excadrill · Sunflora · Lanturn · Comfey · Noivern
Mountain damage and a land-only core for a boss that retreats, heals and resists slow.
Noivern · Excadrill · Sunflora · Watchog · Absol · Ampharos
A central support pocket, a lower merge guard, and poison for a burn-resistant boss.
Noivern · Excadrill · Sunflora · Watchog · Arbok · Ferrothorn
Water wave damage, mountain armor coverage, then stronger individual hits for Sturdy.
Excadrill · Greninja · Sunflora · Lanturn · Arbok · Watchog
An inner-turn damage pocket with armor damage, detection and two different control effects.
Excadrill · Greninja · Sunflora · Watchog · Ferrothorn · Ampharos
A land-and-water pocket with native detection as backup for repeated Shadow Shield cycles.
Excadrill · Greninja · Sunflora · Lanturn · Xatu · Ferrothorn
Before you copy a team
01
Keep the core inside its support
Sunflora and Illuminate affect nearby towers. The attacker needs to be inside the aura; an enemy passing through a support circle does not give every tower the effect.
02
Use the right phase and terrain
An armor specialist, a wave clearer and a boss attacker solve different problems. Keep detection through the last invisible wave, and check a replacement can stand on the selected tile.
03
Treat levels as a range constraint
The diagrams use level-100 base ranges without items or aura extensions. Final evolutions unlock at specific levels, but no minimum level for clearing each route has been verified here.
For role strengths and held-item pairings, compare the individual Pokémon in our Tier List. Use this page when you need the route, the position and the replacement decision. Compare individual Pokémon in the Tier List →
Starting with a smaller roster? Learn starter choices, gold upgrades and early-wave troubleshooting in the PokéPath TD beginner’s guide →
Route 1-1: Outdamage recovery on the lake loop
7 Field · 7 Grass · 5 Water · 1 Mountain
Wave 100 — Shaymin: Shaymin has 120,000 HP, regenerates 1,000 HP per second, and periodically clears its status effects. A poison-only finish is unreliable.
Select a map marker or a Pokémon button to inspect its base range. The written lineup below remains the full plan.
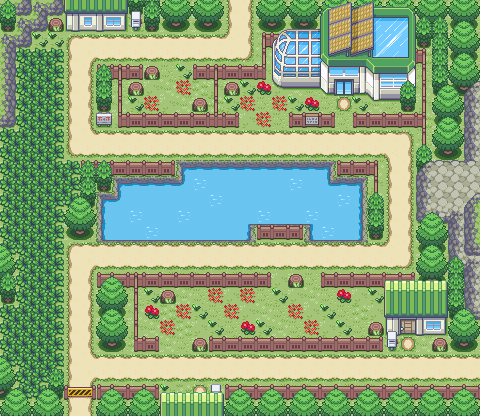
Official map art and buildable tile positions; numbered placements are our suggested layout. Normal direction only.
Base range only: held items, level differences, aura bonuses and weather can change the actual result. Use X in the desktop game to check your current ranges.
C = column, R = row, counted from the top-left of the 30 × 26 reference grid. Map numbers are guide labels, not team-management slots.
The six-Pokémon core
- 1

Greninja
Wave damage
Use the middle lake tile. Ricochets work on clustered waves, while the nearby field support can reach this water position.
Target: First
- 2

Excadrill
Armor damage
Use the lower field row, toward the right. This keeps the armored-enemy answer beside the late section of the path.
Target: High Armor·Optional item: Carbos
- 3

Sunflora
Power support
The lower field position can cover Greninja across the bank and Excadrill to the right at the reference level. Check both with the range overlay.
Target: Aura
- 4

Lanturn
Detection aura
This lake position reaches Greninja and just reaches Excadrill at the reference range. It does not grant detection to every attacker on the map.
Target: Aura
- 5

Comfey
Recharge support
Place between the ground attackers. Its aura reaches Excadrill and Noivern; it does not reach the water Greninja from this tile.
Target: Aura
- 6

Noivern
Boss pressure
The left end of the lower field row gives Focus a long firing window. Keep the same boss in range instead of chasing short-lived targets.
Target: High HP·Optional item: Carbos
Set up the damage pocket
- Build the wave-clearing pair first, then connect Sunflora and detection to the actual attackers. A support tower outside their reach adds no benefit.
- Keep the lake and lower field positions as one damage pocket. Add a separate native detector on the upper path if leaks happen before enemies reach it.
- Use additional unlocked slots for coverage of the first loop or a control unit. The six numbered placements are a compact core, not a limit on normal-mode teams.
Change the plan for Shaymin
Keep Noivern on the boss and upgrade direct damage if Shaymin repeatedly heals back what you remove. Status effects can help between cleanses, but do not build the finish around indefinitely accumulated poison. A slow unit in an extra land slot can extend contact; the boss can clear that slow as well.
Waves to prepare for
- WAVE 90
- Phantump ×4; Corvisquire ×4
- Confirm that a damage dealer can actually hit the invisible group.
- WAVE 99
- Trevenant ×12; Chansey ×10; Illumise ×4; Volbeat ×4
- Keep wave coverage until this mixed group is gone.
- WAVE 100
- Shaymin ×1
- Watch whether damage exceeds recovery during the firing window.
Missing a core Pokémon—or changing for the boss?
Position 5 → Ferrothorn
field · C17 R20
If the boss leaves your damage pocket too quickly, this lower field slot can trade recharge support for repeated slow. The trade does not guarantee enough damage to beat regeneration.
Position 4 → Watchog
field · C17 R20
Also move Comfey: field · C23 R20
Watchog cannot occupy Lanturn’s Water tile. Put it at C17 R20 on the lower Field row and move Comfey to the free Field tile C23 R20. Watchog reaches Excadrill, but not the Water Greninja; give Greninja a compatible Silph Scope or use a separate native detector for invisible waves. Moving Comfey also removes its aura from Noivern.
If it fails: If waves pass but Shaymin stalls, the problem is sustained boss damage, not automatically missing detection. If only invisible waves leak, inspect the detector-to-attacker connection before buying more raw damage.
Official map, terrain and wavesShaymin passive and resistances
Route 1-2: Cover the rewind, not just the first pass
6 Field · 2 Grass · 6 Mountain · no Water
Wave 100 — Celebi: Celebi teleports backward, removes residual damage effects, recovers 7,000 HP and briefly accelerates. It resists slow, so a normal slow tower is not the boss-control answer.
Select a map marker or a Pokémon button to inspect its base range. The written lineup below remains the full plan.
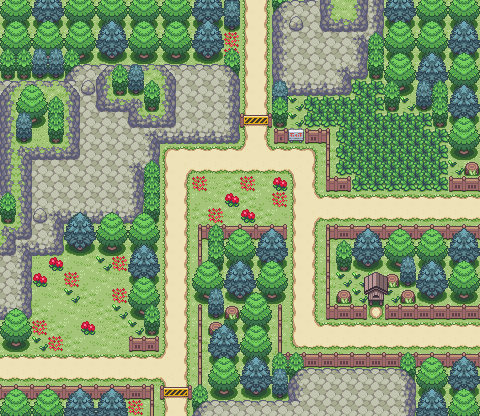
Official map art and buildable tile positions; numbered placements are our suggested layout. Normal direction only.
Base range only: held items, level differences, aura bonuses and weather can change the actual result. Use X in the desktop game to check your current ranges.
C = column, R = row, counted from the top-left of the 30 × 26 reference grid. Map numbers are guide labels, not team-management slots.
The six-Pokémon core
- 1
Noivern
Long-range Focus
Use the upper central mountain. Its reach covers a longer part of Celebi’s return journey than a short-range attacker at one corner.
Target: High HP·Optional item: Carbos
- 2
Excadrill
Armored-wave coverage
Use the lower of the two western mountain positions. Sunflora and the mountain detector can both reach this slot.
Target: High Armor
- 3
Sunflora
Shared power aura
The central field tile is within the reference aura distance of both mountain attackers. The two distant eastern Grass tiles are not equivalent support positions.
Target: Aura
- 4

Watchog
Mountain detection
The mountain between the two attackers reaches both Noivern and Excadrill. It cannot cover the whole lower field cluster as well.
Target: Aura
- 5

Absol
Close-range cleanup
Use the upper-right tile of the lower-left Field cluster. This gives a short-range Focus user access to the nearby stretch of path.
Target: First
- 6

Ampharos
Stun chance
Use the field directly below Absol. Stun can interrupt targets that are not stun resistant, but a 30% chance is not a guaranteed lock.
Target: Not Stunned·Optional item: Carbos
Set up the damage pocket
- Connect the mountain trio before filling the far eastern Grass. Long distance between buildable areas makes misplaced support especially costly here.
- Keep the lower Field pair near the path. Moving Absol to the far-left Field tile can reduce the useful length inside its short attack range.
- Prepare for the return pass: leave Noivern in a position that still covers the rewound path, rather than moving every attacker toward the exit.
Change the plan for Celebi
After wave 99 is clear, consider replacing the armor specialist with a dedicated boss attacker. Keep the long-range Focus unit and the stun chance; do not count on Ferrothorn to stop a slow-resistant Celebi. If its health rebounds every cycle, increase direct pressure and firing time rather than adding poison stacks that its rewind removes.
Waves to prepare for
- WAVE 20
- Sudowoodo ×1; Bonsly ×24
- Check armor damage before assuming the early waves represent the full route.
- WAVE 52
- Phantump ×1; Corvisquire ×7; Ditto ×4
- Have the mountain damage pair connected to Watchog.
- WAVE 100
- Celebi ×1
- Expect repeated recovery and a faster movement window after teleporting.
Missing a core Pokémon—or changing for the boss?
Position 2 → Weavile
mountain · C8 R12
A same-tile boss option after armored waves are finished. It trades Armor Break for rapid critical damage; its shorter range means you must check how much of Celebi’s path it can hit.
Position 1 → Clawitzer
field · C17 R13
A ranged replacement when Noivern is unavailable, but it cannot stand on the mountain. Move it to the second central Field tile; Sunflora reaches it, while detection must be checked separately.
If it fails: If a slow tower seems ineffective on the boss, recheck Celebi’s resistance rather than stacking more of the same status. If Noivern keeps switching targets during mixed waves, reserve its boss targeting change until wave 100.
Official map, terrain and wavesCelebi passive and resistances
Route 2-1: Cover both lanes and keep long-range pressure
7 Field · 4 Grass · 1 Mountain · no Water
Wave 100 — Moltres: Moltres has 60,000 armor and takes half damage from units when it is nearby. It resists burn but not poison, slow or stun.
Select a map marker or a Pokémon button to inspect its base range. The written lineup below remains the full plan.
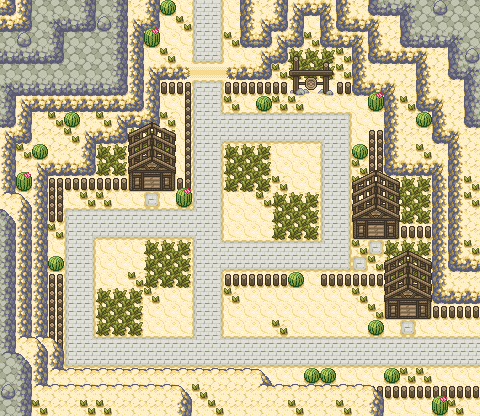
Official map art and buildable tile positions; numbered placements are our suggested layout. Normal direction only.
Base range only: held items, level differences, aura bonuses and weather can change the actual result. Use X in the desktop game to check your current ranges.
C = column, R = row, counted from the top-left of the 30 × 26 reference grid. Map numbers are guide labels, not team-management slots.
The six-Pokémon core
- 1
Noivern
Long-range boss damage
The upper central Field position can fire across a broad section of the route. Its range helps maintain contact without following the boss around.
Target: High HP·Optional item: Carbos
- 2
Excadrill
Armor specialist
Use the Field tile southwest of Noivern. Both central auras reach it, making it the reliable armored-wave anchor.
Target: High Armor
- 3
Sunflora
Central power aura
The Grass tile immediately west of Noivern is close to both core attackers. A Grass tile far down the map would support a different group.
Target: Aura
- 4
Watchog
Central detection
This Grass tile reaches both Noivern and Excadrill. Detection is attached to those attackers; it is not a global reveal.
Target: Aura
- 5

Arbok
Poison application
Use the western lower Grass tile near the second lane. Apply poison while durable targets are inside its short range.
Target: High HP·Optional item: Carbos
- 6

Ferrothorn
Lower-path control
The lower Field tile guards the approach to the shared bottom stretch. It gives the central attackers more time when enemies enter their coverage.
Target: Not Slowed
Set up the damage pocket
- Begin with the two central damage slots and auras, then inspect both entrances. A team that clears one lane can still lose to the other.
- Use the lower control position to catch traffic beyond the central pocket. Add a second attacker on a spare lower Field tile if that lane leaks before reaching the core.
- Keep water-only substitutions out of this plan. This map has no Water tile for Lanturn or Lapras.
Change the plan for Moltres
Keep Armor Break for the armor bar and use long-range direct damage plus poison rather than a burn-focused finish. Do not place every attacker at the closest possible tile: Moltres penalizes nearby damage. The exact Flame Body distance is not specified here, so use the in-game damage display to compare positions instead of assuming a particular tile avoids it.
Waves to prepare for
- WAVE 20
- Golett ×12; Larvitar ×15
- Make sure the armor specialist is contributing across the active lanes.
- WAVE 35
- Kecleon ×3; Sandslash ×3; Krokorok ×5
- Confirm the central attackers retain detection.
- WAVE 89
- Kecleon ×27; Krokorok ×10
- Keep detection online through the late waves; do not replace it early for boss damage.
Missing a core Pokémon—or changing for the boss?
Position 5 → Ekans
grass · C11 R17
A development-stage poison option on the same Grass tile. Its smaller range and weaker basic stats reduce coverage; it is not a promise of Arbok-equivalent clear speed.
Position 6 → Tangrowth
field · C16 R20
A same-tile slow alternative. It is a single-target attacker rather than the same area-control pattern, so keep an eye on dense groups split across the two lanes.
If it fails: A single weak lane is a placement problem before it is a reason to rebuild the whole team. On Moltres, burn resistance and the nearby-damage penalty can make an apparently stronger damage stack underperform.
Official map, terrain and wavesMoltres passive and resistances
Route 2-2: Build around a map with no Field tiles
6 Grass · 4 Water · 9 Mountain · no Field
Wave 100 — Regirock: Regirock has 100,000 armor and Sturdy subtracts 200 from incoming damage events. It resists both stun and slow, but not poison or burn.
Select a map marker or a Pokémon button to inspect its base range. The written lineup below remains the full plan.
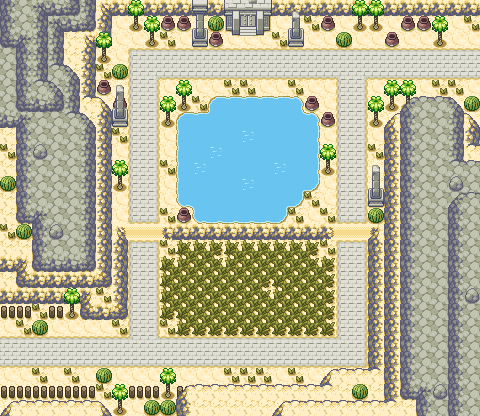
Official map art and buildable tile positions; numbered placements are our suggested layout. Normal direction only.
Base range only: held items, level differences, aura bonuses and weather can change the actual result. Use X in the desktop game to check your current ranges.
C = column, R = row, counted from the top-left of the 30 × 26 reference grid. Map numbers are guide labels, not team-management slots.
The six-Pokémon core
- 1
Excadrill
Left-lane armor coverage
Use the western mountain beside the lower turn. A Field-only attacker cannot replace it here.
Target: High Armor
- 2
Greninja
Water wave damage
Use the southeast Water tile. Ricochets help the wave phase, and the southern support pocket can reach this position.
Target: First
- 3
Sunflora
Water-pocket power
The upper middle Grass tile reaches Greninja across the bank at the reference level. It does not reach the distant western mountain attacker.
Target: Aura
- 4
Lanturn
Water-pocket detection
The southwest Water tile connects detection to Greninja. It does not cover the western mountain cluster.
Target: Aura
- 5
Arbok
Boss poison
The southwest Grass tile gives poison access to the lower route. Leave it close enough to the path to apply repeated hits.
Target: High HP·Optional item: Carbos
- 6
Watchog
Mountain-pocket detection
The western mountain above Excadrill keeps that second damage pocket able to hit invisible enemies.
Target: Aura
Set up the damage pocket
- Build two separate pockets: Greninja with Lanturn near the pond, and Excadrill with Watchog on the western mountains. One detector cannot bridge them.
- Use Grass for aura and poison roles. Do not copy a Field-heavy lineup into these slots; there are no Field positions at all.
- Keep Greninja through the last mixed wave. Only make the boss substitutions after the remaining wave enemies are gone.
Change the plan for Regirock
After wave 99 is completely clear, consider two direct changes: Excadrill to Machamp on the western Mountain, and Greninja to Clawitzer in the pond. Keep Arbok applying poison. These heavier-hit options address Sturdy; they are not reasons to lose wave coverage early. Watchog can become another legal attacker only after invisible enemies are gone. Ordinary slow and stun should not be the plan for holding Regirock in place.
Waves to prepare for
- WAVE 20
- Golurk ×1; Golett ×24
- Check the armor pocket and both lanes.
- WAVE 51
- Kecleon ×8; Pupitar ×7; Cacnea ×1
- Both damage pockets need their own detection solution.
- WAVE 100
- Regirock ×1
- Switch from wave coverage to hits that survive the flat damage reduction.
Missing a core Pokémon—or changing for the boss?
Position 2 → Clawitzer
water · C18 R12
Boss-phase replacement on the same Water tile. It loses ricochet wave coverage but has a very different per-hit damage profile and much longer base range.
Position 1 → Machamp
mountain · C5 R16
Boss-phase replacement on the same Mountain tile. Both have Armor Break, but Machamp has much heavier individual hits and a slower recharge. This is a damage-profile change for Sturdy, rather than an assumption that every armor specialist performs equally.
If it fails: A support aura beside the pond does not automatically buff the western mountains. If weak hits seem to do very little on Regirock, examine Sturdy and the damage per hit, not just the attack-speed number.
Official map, terrain and wavesRegirock passive and resistances
Route 3-1: Favor frequent hits over one enormous hit
11 Field · 6 Grass · no Water · no Mountain
Wave 100 — Registeel: Registeel has 125,000 armor. Light Metal caps a damage event at 1,000 in the current official game code. It resists poison, but not slow, stun or burn.
Select a map marker or a Pokémon button to inspect its base range. The written lineup below remains the full plan.
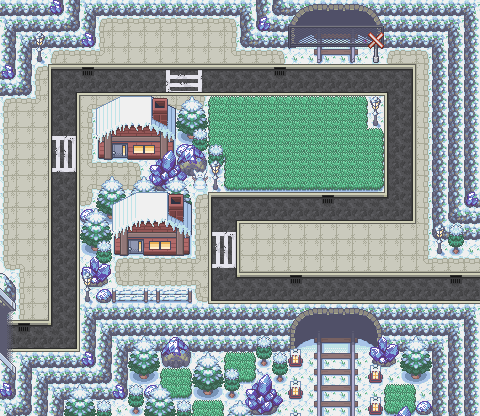
Official map art and buildable tile positions; numbered placements are our suggested layout. Normal direction only.
Base range only: held items, level differences, aura bonuses and weather can change the actual result. Use X in the desktop game to check your current ranges.
C = column, R = row, counted from the top-left of the 30 × 26 reference grid. Map numbers are guide labels, not team-management slots.
The six-Pokémon core
- 1
Excadrill
Frequent armor hits
Use the second Field position under the inner road. The two adjacent Grass auras can reach it.
Target: High Armor·Optional item: Carbos
- 2
Greninja
Fast wave damage
Use the Field immediately to the left of Excadrill. Keep ricochets for groups until the boss phase.
Target: First
- 3
Sunflora
Shared power support
The southwest Grass tile reaches both attackers at the reference range. It does not reach the far-right Field slots.
Target: Aura
- 4
Watchog
Shared detection
The central lower Grass tile covers the two close Field attackers. Check this connection again if you move either one.
Target: Aura
- 5
Ferrothorn
Slow at the inner turn
The southeast Grass tile puts slow next to the same stretch the core attacks. Slow and stun are different effects; duplicate slows do not add together.
Target: Not Slowed
- 6
Ampharos
Stun chance
Use the Field east of Excadrill. It adds a separate control opportunity instead of relying on poison against a poison-resistant boss.
Target: Not Stunned·Optional item: Carbos
Set up the damage pocket
- Keep the damage pair directly below the inner road and the auras directly above it. Spreading the attackers to the far-right Field positions breaks the support pocket.
- Develop the fast attackers and check their actual firing time before buying another large single-shot unit. The boss has a per-event cap, not a reason to stop upgrading every unit.
- Preserve detection for the regular waves. When all enemies are the boss, keep the useful control and direct-damage roles rather than automatically carrying a money-farming team.
Change the plan for Registeel
Keep frequent attackers firing into the controlled inner turn. After wave 99, consider the listed Greninja-to-Weavile boss swap if its shorter range still covers the turn. Once a hit is already at the 1,000 cap, raising that same hit further cannot bypass Light Metal; recharge and contact time can still matter. Avoid a poison stack or treating one giant Focus hit as an uncapped solution. Power upgrades can still help attacks that remain below the cap.
Waves to prepare for
- WAVE 35
- Absol ×3; Weavile ×3; Palpitoad ×5
- Keep the inner-turn pocket covering mixed speeds.
- WAVE 99
- Snorlax ×4; Slowpoke ×4; Jynx ×1; Lapras ×1
- Finish mixed-wave coverage before any optional boss changes.
- WAVE 100
- Registeel ×1
- Watch attack frequency, control uptime and the 1,000-per-event limit.
Missing a core Pokémon—or changing for the boss?
Position 5 → Tangrowth
grass · C22 R11
A same-Grass slow option with a different attack pattern. It replaces the control role, not every aspect of Ferrothorn’s area coverage.
Position 2 → Weavile
field · C17 R16
A same-Field rapid attacker for the boss phase, or when Greninja is unavailable. It trades ricochet coverage for frequent critical hits. Its shorter base range changes the firing window, so finish wave 99 first and recheck the turn rather than assuming identical coverage.
If it fails: If large power upgrades stop changing the damage number, check the cap. If damage falls after adding a new attacker, first check whether moving the original carry disconnected Sunflora or Watchog.
Official map, terrain and wavesRegisteel passive and resistances
Route 1-3: Keep detection through the boss phase
4 Field · 7 Grass · 8 Water · 4 Mountain
Wave 100 — Lunala: After losing invisibility, Lunala restores it and its shield after four seconds. It resists stun and poison, but not slow or burn.
Select a map marker or a Pokémon button to inspect its base range. The written lineup below remains the full plan.
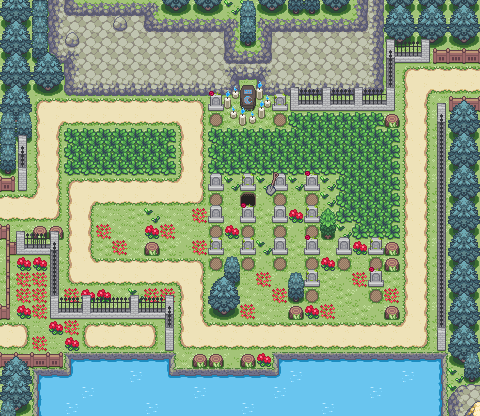
Official map art and buildable tile positions; numbered placements are our suggested layout. Normal direction only.
Base range only: held items, level differences, aura bonuses and weather can change the actual result. Use X in the desktop game to check your current ranges.
C = column, R = row, counted from the top-left of the 30 × 26 reference grid. Map numbers are guide labels, not team-management slots.
The six-Pokémon core
- 1
Excadrill
Armor and shield pressure
Use the southwestern of the two lower Field tiles. Keep it inside Lanturn’s reference aura rather than assuming all Field positions receive detection.
Target: High Armor·Optional item: Carbos
- 2
Greninja
Southern water damage
Use the southern Water tile southeast of the support pocket. It sits inside the reference ranges of both Sunflora and Lanturn.
Target: First
- 3
Sunflora
Land-and-water support
The southeastern Field tile reaches Excadrill to the west and Greninja below. At lower levels, confirm that the cross-bank aura still reaches.
Target: Aura
- 4
Lanturn
Persistent detection
The southern Water tile directly below Excadrill reaches both core attackers. Keep this aura for wave 100, not just the invisible wave mobs.
Target: Aura
- 5

Xatu
Independent detection
The western Field tile gives a native detector a separate firing window. Xatu does not grant its own detection ability to nearby attackers.
Target: Invisible·Optional item: Silph Scope
- 6
Ferrothorn
Eastern-path slow
Use the eastern Grass tile below the upper row. Slow can extend contact on Lunala; ordinary stun is resisted.
Target: Not Slowed
Set up the damage pocket
- Build the lower Field-and-Water triangle around Sunflora and Lanturn. A gap in this connection is more important than adding another undetected damage unit.
- Use Xatu for an earlier, independent detection window. Its job is different from an aura that enables the rest of the core.
- Keep detection, armor damage and slow in the boss plan. This is not a route where every support should be sold or swapped for a raw boss carry.
Change the plan for Lunala
Keep Lanturn connected to the two core attackers for the entire fight, with Xatu as an independent detection option. If damage stops and starts, watch the invisibility cycle before concluding the team lacks raw power. Slow can help retain contact; neither ordinary stun nor a poison-only strategy is a suitable substitute for the required detection.
Waves to prepare for
- WAVE 23
- Trevenant ×6; Fraxure ×15; Corviknight ×5; Dodrio ×22
- Native detection or the connected aura is already needed well before wave 90.
- WAVE 95
- Togedemaru ×70
- Retain group coverage instead of switching to a boss-only lineup too early.
- WAVE 100
- Lunala ×1
- Maintain detection through recurring invisibility and shield recovery.
Missing a core Pokémon—or changing for the boss?
Position 5 → Noivern
field · C12 R15
A long-range Field option only if it has a compatible Silph Scope or a verified detection connection. The listed western Field tile is outside Lanturn’s base aura, so an unscoped Noivern is not a drop-in detector.
Position 6 → Tangrowth
grass · C24 R13
A same-Grass slow alternative. It keeps the relevant control role, while changing the number of enemies you can control with one attack.
If it fails: If the boss suddenly stops taking hits, inspect invisibility and the aura connection first. Do not remove the only detection source to fit another attacker; the added damage may have no eligible target.
Official map, terrain and wavesLunala passive and resistances
Build toward the lineup without waiting for every evolution
Develop a useful damage unit, a way to hit invisible enemies and the support that actually reaches your carry. Do not spread all upgrades evenly across six unfinished Pokémon.
An early native detector
Natu → Xatu at level 25
Natu can already detect. Evolving improves its coverage, but neither form makes nearby damage dealers detect.
A detector for the land pocket
Patrat → Watchog at level 20
A land aura enables compatible nearby attackers. It occupies Field, Grass or Mountain, never Water.
A detector for the water pocket
Chinchou → Lanturn at level 27
Water-only placement with an aura. A land detector is not a same-tile replacement.
A wider power-support aura
Sunkern → Sunflora at level 25
Sunkern is usable earlier, but its level-100 base range is 107 rather than Sunflora’s 170. Copying the same position can miss a carry.
An armor specialist
Drilbur → Excadrill at level 31
Field or Mountain only. Keep the armor role separate from the job of permanently stripping armor.
Ricochet wave damage
Frogadier → Greninja at level 36
Field or Water. Removing ricochets with Loaded Dice changes its job; do not do it blindly for dense waves.
Repeatable control or boss reach
Ferroseed → Ferrothorn at 40; Noibat → Noivern at 48
These unlock different jobs. Slowing a resistant boss and placing a long-range unit outside support are both avoidable mistakes.
Replace the job, then recheck the tile
A replacement can match the role while changing range, attack pattern or support requirements. These are practical tradeoffs, not equal-strength promises.
| Missing role or Pokémon | Consider | What changes |
|---|---|---|
| Excadrill | Machamp | Both use Field or Mountain and have Armor Break. Machamp’s slower, heavier hits behave differently against flat reduction and per-event caps. |
| Greninja | Clawitzer | Both fit Field or Water. Clawitzer offers a much longer single-target window, but does not replace ricochet wave coverage. |
| Noivern | Clawitzer on Field; another ranged attacker on Mountain | Clawitzer cannot occupy Noivern’s Mountain tile. Move the position and reconnect the auras before calling the swap complete. |
| Lanturn | Watchog on nearby land | The replacement must relocate. Check every important attacker: a smaller, differently positioned aura can leave the water carry undetected. |
| Watchog | Natu or Xatu for independent detection | Native detection helps only that attacker. It does not duplicate Watchog’s aura; additional damage dealers need their own detection solution. |
| Sunflora | Sunkern while developing the team | Both use Field or Grass, but their reach differs. Move the support toward the priority carry instead of expecting the full evolved layout to work. |
| Ferrothorn | Tangrowth on Field or Grass | The slow role remains, but the attack pattern changes. Neither ordinary slow option bypasses a boss’s slow resistance by default. |
| Arbok | Ekans while leveling | The poison role is available earlier, with a shorter reach and weaker direct damage. Neither is a substitute for the anti-armor role on every boss. |
| A second developed attacker | Ditto copying the intended first team member | Transform follows the first Pokémon in team management and uses Ditto’s own level. It does not automatically copy the strongest unit, and an underleveled Ditto is not a free level-100 carry. |
Choose items for the route problem
The diagram ranges are unmodified. Items below are optional adjustments; check the holder’s compatible-item list before moving an item between roles.
Carbos
A straightforward recharge option for compatible attackers such as Noivern, Excadrill and Ampharos. Shorter recharge helps only while a useful target remains in range.
Silph Scope
A personal detection option for compatible attackers. It does not give the whole team an aura, and Excadrill is not in the official compatible-holder list. Xatu can use it for the additional native-detector bonuses.
Loaded Dice
Trades away ricochets for power. Consider the change for a focused-target job; keep the bounce pattern when the problem is a dense mixed wave. This is not a universal Greninja upgrade.
Diagnose the failure before replacing six Pokémon
- Only invisible enemies leak
- Select the actual damage dealer, then inspect its detection source and aura distance. A native detector elsewhere on the map does not enable it.
- Restore a working detector-to-attacker connection before adding damage.
- The regular waves clear, but the boss does not
- Read the boss passive and resistance flags. Regirock’s flat reduction and Registeel’s per-event cap reward different damage profiles.
- Change the boss role after wave 99, keeping any mechanic still required on wave 100.
- A copied formation performs differently
- Compare version, evolution, levels, targeting, held items and the exact support positions. The diagrams show base reference ranges, not every buffed range.
- Use the in-game range and damage displays to change one cause at a time.
- An extra support makes the team weaker
- Check whether it replaced a needed damage, detection or control slot. Two aura towers that miss the carry do not compensate for one lost attacker.
- Reconnect the existing core before expanding it.
- Two slow towers do not double the slowdown
- The official FAQ says ordinary Slow does not stack with itself. Poison and Nightmare have different stacking rules.
- Use sustained coverage or a different compatible status instead of assuming additive slow.
Questions about these route teams
What is the best team for every route in PokéPath TD?
There is no single universal lineup here. Use the route’s actual terrain, invisible waves and boss passive to choose the team. This guide covers six normal-mode routes with different damage and support pockets; it does not claim to solve every map or challenge.
Are these six-slot challenge clears?
No. Six markers describe a compact normal-mode core. Use additional unlocked slots for needed coverage. Level-cap, slot-limit, Mirror, Tough Enemies and No Items challenges change the assumptions and need their own validation.
What level do I need to beat each boss?
A guaranteed minimum clear level has not been established for these plans. The evolution table lists unlock levels, while range previews use level-100 base values. Lower levels, different equipment and changes in targeting can alter the result.
Why does my Route 1-1 show Articuno instead of Shaymin?
You are using a different map/version reference from these layouts. The current official map page lists Shaymin for Route 1-1. Match the boss and layout first, and export your save before changing game builds.
Does Ditto copy the first map marker?
No. Ditto copies the first Pokémon in your in-game team-management order, adjusted to Ditto’s own level. The numbers on these diagrams are placement labels and do not set the team order.
Can I remove detection for the boss wave?
Only if that boss and the remaining enemies do not require it. Lunala repeatedly restores invisibility, so Route 1-3 still needs a functioning detection plan through the entire boss fight.
Can I turn these builds into a gold farm?
Clearing a boss and farming it safely are different tasks. These lineups aim to remove enemies, while a farm can require controlled repeated hits and carefully limited damage. See the farming-role explanation on the Tier List rather than assuming a fast-clear lineup is also an efficient farm. Read the farming-role explanation →
What is verified, and what is a recommendation?
Route unlocks, buildable tiles, wave samples, terrain permissions, unit abilities and item compatibility were checked against Khydra’s official site on November 2, 2026. The Registeel damage cap was also checked in the public game code linked by the official Play page. Map artwork belongs to the game creators; the numbered layouts and replacement judgments are our own recommendations.
The formations have not been recorded as full-run or no-damage clears. No success rates, completion times or minimum clear levels are claimed. Recheck the official reference after a balance patch; old screenshots and older community farms can stop matching the current game.